
|
|
|
|
|
|||||||||||||
|
|
| |||||||||||
|
|
Creating Raspberry Pi Boot Images
For Raspberry Pi -based systems, you may need to replace your disk image with a newer version. If it is not already supplied in the form of a ready-to-go micro-SD card, follow the procedures below.

If you do not already have a micro-SD card reader installed in your PC, you will need a micro-SD card reader (or micro-SD to SD card adapter + SD card reader). External low-cost USB units are commonly available, compatible with all types of PC's.
For SS-One application images, a 16GB card is recommended, but larger cards are fine too. Disk images are available on Hutech's download page.
Download the desired file and unzip the image file, which will have the extension of ".img".
The procedure for generating a new image card requires using a special utility to copy the boot partition as well as the normal system files. The utility you use will depend on the PC system you are using.
Windows PC
http://sourceforge.net/projects/win32diskimager/files/latest/download Follow the instructions for downloading and installing the program on your system.
To write the .img file to your micro-SD card, put the card into your reader and note the disk drive letter assigned to it (e.g. "K:") Be sure that you have correctly identified the drive containing the micro-SD card. That drive will be completely overwritten with the .img file so check twice!
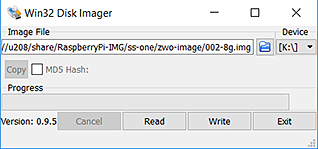
Next start Win32DiskImager. You may be required to enter your system's administrator password to allow it to run.
Click on the "Device" selection on the right to target the correct destination drive, then click on the folder symbol next to it to select the .img file to write to the drive.
After insuring that the file and destination drive are correct, click on "Write" to copy the file to the micro-SD card.
Once the write has completed, click on the "Exit" button to close the program, eject the card, and insert it into the SS-one to boot up.
|
||||||||||||

|
|||||||||||||